If you live in Hoboken — especially in a brownstone near Washington Street or an older walk-up near the waterfront — you know how quickly a small ceiling issue can spiral out of control. That’s exactly what happened to a homeowner I recently helped, and I want to share the story from my point of view — someone who sees this kind of damage every week.
The First Signs You Shouldn’t Ignore
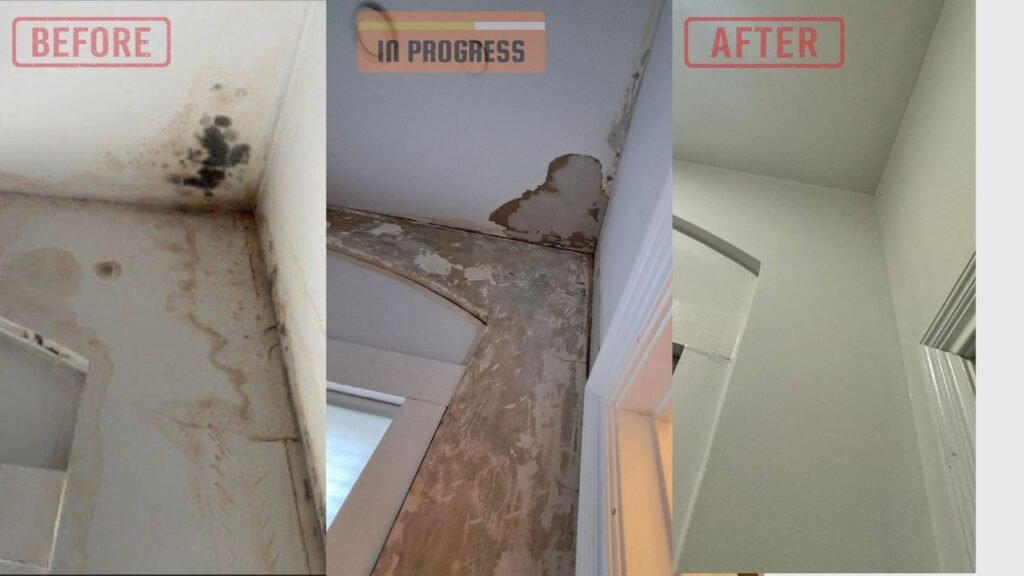
George, my friend in the Quick sidekick Office, got a call earlier this week, from a homeowner who noticed a few black spots forming on her ceiling. At first, she didn’t think it was a big deal. But within a couple of weeks, those spots spread, the paint started cracking, and a musty smell crept into the living room.

When I arrived, I knew right away this was more than just surface damage. We see this a lot in Hoboken homes, especially in brownstones and older buildings — what looks like a small issue is often just the tip of the iceberg.
Quick Sidekick Tip: If you live in a multi-family building or historic brownstone, don’t assume your ceiling spots are “just old paint.” They’re usually a sign of something deeper. Our team offers free inspections in Hoboken, North Bergen, and beyond.
What I Found During the Inspection
As soon as I did a full ceiling inspection using our moisture tools and safety protocols, it became clear:
- Moisture from an old plumbing leak had seeped into the ceiling
- The drywall was compromised
- Mold had started spreading
I knew we had to act fast — not just to fix the damage, but to do it the right way so it wouldn’t return.

The Quick Sidekick Solution: Clean, Safe, Beautiful Results
I’ve been repairing ceilings and walls across New Jersey for over 12 years, and trust me — I’ve seen it all. From surface cracks to full-blown mold infestations hiding behind layers of paint. Once I finished the inspection, here’s exactly what I did step by step:
Step 1: Mold-Safe Demolition
The first thing I did was carefully remove the affected section of drywall. I used mold-containment measures to make sure no spores spread to other parts of the home. That meant sealing off the area, using proper masks and filters, and disposing of contaminated materials responsibly.
Step 2: Inspect the Structure Beneath
After removing the drywall, I always check the ceiling joists and insulation. In this home, the boards underneath were still structurally sound, but a section of the ceiling board was waterlogged and had to go. Catching it early helped the homeowner avoid bigger repairs later.
Step 3: Replace Damaged Ceiling Boards
I installed new, moisture-resistant drywall cut to fit the space perfectly. This part has to be precise – a poor fit leads to uneven seams, which show up clearly once you paint.
Step 4: Prep with Mold-Resistant Primer
Before applying any color, I always treat the area with a top-grade mold-resistant primer. This isn’t optional. It helps prevent future growth and gives a smoother finish. I use products I trust from years on the job – no cheap stuff.
Step 5: Custom Paint Matching & Finish
Here’s where experience really counts. I matched the paint color to the room’s original shade using a blending technique that avoids any “patch” effect. In older homes, that’s key – you want it to look like nothing ever happened. I feathered the edges, used a multi-layer rolling technique, and made sure lighting wouldn’t reveal any texture inconsistencies.
I never leave a job looking “just okay.” At Quick Sidekick, we treat your home like it’s our own – especially when it comes to visible spaces like ceilings. Whether it’s a small corner or an entire room, we aim for seamless, safe, and beautiful results.
“You’d never know the ceiling was damaged. It looks like nothing ever happened.”
— Hoboken homeowner after our repair
When to Call a Pro (And What It Might Cost You Later)
I’ve seen too many homeowners wait on ceiling repairs until it’s too late. Here’s the truth:
- Hidden mold spreads fast
- Drywall can sag or collapse
- Paint damage ruins the look of your home
Worst case?
You’re looking at full ceiling replacement, mold remediation with permits, and major problems if you try to sell your home later.
Catching it early can save you thousands. Most fixes I do cost under $500. Wait too long, and it could jump to $2,000+.
What to Expect When You Call Quick Sidekick
When I show up to a job, here’s what you can expect:
- Clear, upfront pricing (no surprises)
- A clean job site — we treat your home with respect
- Seamless paint blending — no visible “patch” marks
- Fast turnaround (usually 1–2 days)
Quick Sidekick has helped dozens of homeowners across Hoboken, North Bergen, and Fort Lee get honest, affordable ceiling repairs — without stress or upselling.
Call 1-888-Quick-80 to book your free ceiling inspection